 Sarra
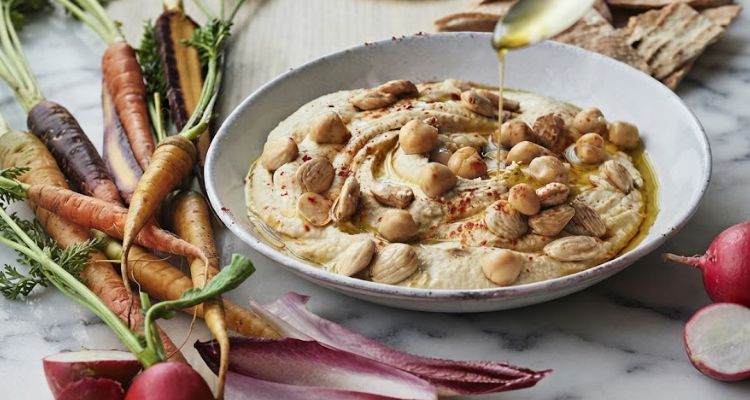
Sarra Ina Garten’s hummus is a silky smooth blend of chickpeas, tahini, fresh lemon juice, garlic, smoked paprika, and a splash of Tabasco, finished with chopped Marcona almonds and a generous drizzle of olive oil. It takes about 45 minutes from start to finish and serves 6 as an appetizer or part of a mezze spread. The only real hands-on work is removing the chickpea skins, which Ina makes easy with one clever pantry staple.
This recipe is the “Creamy Hummus” from Ina’s Go-To Dinners cookbook (2022), and she designed it as a direct upgrade to the hummus from her very first book. In the headnote, she writes that the original was “chunky and delicious,” but this version removes the chickpea skins for what she calls “a luxuriously silky hummus.” Ina has published hummus recipes across five cookbooks over 23 years, and this is the most refined of all of them.
The technique that sets this apart is simmering the canned chickpeas with baking powder for 25 minutes, then rinsing away the loosened skins in several changes of cold water. Those papery skins are what make most homemade hummus gritty no matter how long you process it. Remove them and the food processor does the rest in about 60 seconds. Skip this step and you get the same chunky texture as every other recipe out there.
Ina Garten Hummus Recipe
Course: AppetizersCuisine: MediterraneanDifficulty: Easy6
servings20
minutes25
minutes230
kcalIna’s most refined hummus, updated from her original 1999 version with a baking powder simmer and skin-removal step that produces restaurant-smooth texture. Topped with Marcona almonds, smoked paprika, and olive oil for a crowd-ready appetizer.
Ingredients
-
2 (15.5-ounce) cans chickpeas, rinsed and drained
-
1/2 teaspoon baking powder
-
1/3 cup (80ml) freshly squeezed lemon juice, plus 2 to 3
-
tablespoons extra (about 3 lemons)
-
1 tablespoon garlic, finely grated on a Microplane (4 cloves)
-
1/4 teaspoon Tabasco sauce
-
1/4 teaspoon smoked paprika, plus extra for garnish
-
Kosher salt and freshly ground black pepper
-
1/2 cup (120g) tahini
-
Good olive oil
-
1/4 cup (35g) salted roasted Marcona almonds, roughly chopped
-
Toasted pita triangles for serving
Directions
-
Simmer the chickpeas: Combine the chickpeas, baking powder, and 6 cups of water in a large saucepan. Cover and bring to a boil over high heat. Uncover, lower the heat, and simmer for 25 minutes, stirring occasionally.
-
Soak the garlic: While the chickpeas cook, combine the 1/3 cup lemon juice and the grated garlic in a small bowl. Set aside so the lemon juice mellows the raw garlic flavor.
-
Remove the skins: Drain the water and any skins that floated to the surface. Add cold water to cover, stir vigorously to loosen more skins, and drain again. Repeat 5 or 6 more times until most of the skins are removed.
-
Blend until smooth: Set aside 2 tablespoons of whole chickpeas for garnish. Place the rest in a food processor with the lemon-garlic mixture, Tabasco, paprika, 1/4 cup warm water, 1 tablespoon salt, and 1 teaspoon pepper. Process until very smooth, scraping down the bowl as needed.
-
Add the tahini: Add the tahini and 2 tablespoons of olive oil and process for one full minute until creamy. Add 2 to 3 tablespoons of extra lemon juice to taste, 1 teaspoon salt, and enough warm water (1 tablespoon at a time) to reach the consistency of thick yogurt.
- Serve: Spread the hummus on a large flat plate or shallow bowl with a rubber spatula, leaving a raised border around the edge. Top with the reserved chickpeas and chopped almonds. Drizzle with olive oil, sprinkle with paprika, and serve with toasted pita triangles.
Notes
- If your tahini has separated in the jar, process it in the food processor until smooth before measuring. Stirring by hand rarely gets it fully combined.
Toast pita triangles yourself by spreading them on a sheet pan and baking at 350F (180C) for 10 minutes. They come out crispier and less oily than store-bought pita chips.
The hummus should be as smooth as thick yogurt when done. If it still feels grainy after a full minute of processing, add another tablespoon of warm water and blend again for 30 seconds.
FAQs
Why does Ina simmer chickpeas with baking powder?
The baking powder raises the pH of the cooking water, which softens the chickpea skins and causes them to separate from the beans. After 25 minutes of simmering, most of the skins float to the surface or slide off easily when you stir the chickpeas in cold water.
This is the same trick used in Middle Eastern kitchens to achieve restaurant-quality smoothness. Without it, you would have to peel each chickpea by hand, which takes far longer. The baking powder does not change the flavor of the finished hummus.
Is removing the chickpea skins really worth it?
If you want hummus that is truly smooth and not grainy, yes. The skins are made of fiber that never fully breaks down in a food processor, no matter how long you blend. Leaving them in is the main reason most homemade hummus turns out with a rough, pasty texture.
The process takes about 10 minutes after simmering. You add cold water, stir, drain the floating skins, and repeat five or six times. It sounds tedious, but once you taste the difference you will not go back. If you are short on time, Ina’s original 1999 recipe from The Barefoot Contessa Cookbook skips this step entirely and still tastes great, just with a chunkier consistency.
How is this different from Ina’s original 1999 hummus?
The original hummus from The Barefoot Contessa Cookbook is a straight dump-and-blend recipe. You put canned chickpeas, tahini, lemon juice, garlic, Tabasco, salt, and some chickpea liquid into the food processor and pulse. It takes about 5 minutes and the texture is deliberately coarse.
This 2022 version adds the baking powder simmer, the skin removal step, smoked paprika, and olive oil blended directly into the base, plus a full minute of processing for a yogurt-like consistency. Ina also swaps raw minced garlic for garlic grated on a Microplane and soaked in lemon juice, which mellows the sharpness.
Can you make hummus ahead of time?
Hummus keeps in the fridge for up to a week in an airtight container, and the flavor actually improves after a day because the garlic, lemon, and tahini have time to blend together.
When you are ready to serve, bring it to room temperature and stir in a tablespoon of warm water if it has thickened. Add the garnishes fresh: the Marcona almonds, olive oil drizzle, and paprika sprinkle right before the plate hits the table. If you need a cold make-ahead dip that skips cooking entirely, Ina’s Smoked Salmon Dip comes together in minutes and holds just as well.
What should you serve with hummus?
Ina serves this with toasted pita triangles that she makes at home at 350F (180C) for 10 minutes rather than using store-bought chips. The homemade version is crispier and less greasy.
Beyond pita, fresh vegetables like cucumber spears, bell pepper strips, and radishes all work well because their crunch and freshness balance the richness of the tahini. For a full appetizer spread, set the hummus next to a couple of contrasting options so the table has variety. Ina’s Spinach Puff Pastry adds something warm and flaky alongside the cold dip, which keeps guests interested.
